Welcome to my blog! I hope you find some inspiration for your projects, the same way that I find inspiration from the many blogs that I visit each day. My goal for this space is to show and explain the many crafts, food, home decor and genealogy projects that I have done and continue to do. Whenever possible, I'll try to include a list of materials. No promises though, since some of my materials are from many years ago and I don't remember where they came from.
Thursday, September 30, 2010
Wednesday, September 29, 2010
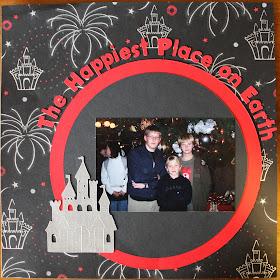
The Happiest Place on Earth & Mickey Mouse
Materials: Bazzill Basics 12x12 Medium Scallop Circle Cardstock "Beetle Black", Sandylion Disney Collection 12x12 Paper Pack "Mickey", Cricut "Mickey Font" Cartridge, Cricut "Mickey and Friends" Cartridge, Creative Imaginations Magic Collection 12x12 Silver Foil Paper "Magic Castle", Cricut "Paper Doll Dress Up" Cartridge, Signo White Uni-ball Impact Pen
Tuesday, September 28, 2010
Haunted Mansion & Space Mountain
Monday, September 27, 2010
Disneyland Week
Sunday, September 26, 2010
Girly Stuff: Chipboard Name Sign and Dress-Up Area
I've been busy this Sunday trying to get some projects done around the house. It's all in preparation for my sons 2nd birthday party. The party is not until November but I'm making a lot of stuff by hand and want to get some projects out of the way around the house first before I dive into the birthday projects. Plus, I like the house to look nice for my guests.
The first project I did today. It's for my daughter, Olivia. I used pre-cut chipboard letters from my local scrapping store and covered them with paper. I traced the letters onto the paper first (be careful because it's easy to trace them on backwards). Then, I glued them onto the chipboard and sanded the edges with an emery board. My crop-a-dile was used to punch holes in the top of each letter. This doesn't actually hang straight and needs the help of a few glue dots.
Materials: 5 1/2" chipboard letters, My Mind's Eye Magnolia 12x12 paper, Crop-a-dile, white ribbon, emery board, paper snips
The second project was completed a few days ago but it's also part of my daughter's room so I figured I'd post it here also. I had this idea in my head for quite some time before it actually became a reality. I'm a big thrift store and garage sale shopper so we've ended up with quite a bit of dress-up stuff. We never seem to have enough space for it all and if you hang things in the closet, the kids can't reach it. I bought the shelving and closet rod at Lowe's. I set the shelving as low as it could go without the dresses dragging on the ground. The top shelf was made from a piece of scrap wood. I painted them both white to match her dresser.
Thursday, September 23, 2010
Cricut Search
Here is some information from the site:
"CricutSearch.com will save you time when working on your scrapbooking, card making or paper crafts. You will no longer have to flip through all of your Cricut handbooks or cheat sheets to find the perfect image to complete your crafting project. Just type it into the search box and we will show you all of the choices you have.
Make sure to save the link to CricutSearch.com on your computer. Next to your scrapbooking paper, paper punches and tape runner, CricutSearch.com could be your most important scrapbooking and card making tool. When you think of scrapbooking and card making we hope you think of CricutSearch.com."
Saturday, September 4, 2010
Boy Baby Shower
Here are some things that I made for my BFF's baby shower a couple of years ago.
This was the invitation. It was a sliding card. The tag slides out and has all the information and a map on the back. The mom-to-be stamp was from the $1 bin at Michaels. I colored her in with some chalk. All of the other products are from Stampin' Up, including the cardstock "It's a Shower" stamp, and background stamps. I used a circle cutter to make the oval cutout on the top. Then, used the paper-piercing pad, tool and template from Stampin' Up to accent the top.
Materials: Stampin' Up Bashful Blue 12x12 Cardstock, Stampin' Up Apricot Appeal 12x12 Cardstock, Stampin' Up Paper-Piercing Tool, Stampin' Up Mat Pack, Stampin' Up Canvas stamp, Stampin' Up Something to Celebrate Stamp Set
Next is the party favor. I used Stage 2 baby food jars. My sister-in-law gave me a bunch of them that she had been saving. Her husband thought she was crazy for keeping them but they sure came in handy didn't they? The information was printed on my inkjet. The little duck is a Cuttlebug die cut. If I made these favors again, I would paint the lids. I filled the jars with chocolate teddy grahams. You can also use the smaller (Stage 1) jars and fill them with M&M's or other candy.
This is a Baby Bottle Six-Pack and was used as a table decoration. It's super easy to make. Paper was cut and then glued to a beer six-pack carrier (you can also sometimes find white carriers at your local scrapbooking store). The only tricky part was cutting the paper around the handle, which I had to cut with an exacto knife. Use the Terrifically Tacky Tape if the paper needs extra hold. You'll need 6 baby bottles. I used Gerber classic bottles. They were plastic but glass ones would look nice also.
Materials: Beverage Six-pack carrier, K and Company - Grand Adhesions - Brenda Walton Collection - Boy Clothesline
And of course no baby shower would be complete if I didn't scrap it. Here is both the shower and my layout for the days before the arrival and then birth day.
Materials: American Crafts 12x12 Paper Baby Collection "Georgie Porgie", American Crafts 12x12 Paper Baby Collection "Little Boy Blue", American Crafts 12x12 Paper Baby Collection "Three Bears", Stampin' Up Barely Banana 12x12 Cardstock, Stampin' Up Bashful Blue 12x12 Cardstock, Stampin' Up Apricot Appeal 12x12 Cardstock, American Crafts Occasions Boxed Ribbon Baby Collection "Mockingbird", Cricut New Arrival Cartridge, Cricut Paper Doll Dress Up Cartridge, Cricut Plantin Schoolbook Cartridge, Prima flowers
This was the invitation. It was a sliding card. The tag slides out and has all the information and a map on the back. The mom-to-be stamp was from the $1 bin at Michaels. I colored her in with some chalk. All of the other products are from Stampin' Up, including the cardstock "It's a Shower" stamp, and background stamps. I used a circle cutter to make the oval cutout on the top. Then, used the paper-piercing pad, tool and template from Stampin' Up to accent the top.
Materials: Stampin' Up Bashful Blue 12x12 Cardstock, Stampin' Up Apricot Appeal 12x12 Cardstock, Stampin' Up Paper-Piercing Tool, Stampin' Up Mat Pack, Stampin' Up Canvas stamp, Stampin' Up Something to Celebrate Stamp Set
Next is the party favor. I used Stage 2 baby food jars. My sister-in-law gave me a bunch of them that she had been saving. Her husband thought she was crazy for keeping them but they sure came in handy didn't they? The information was printed on my inkjet. The little duck is a Cuttlebug die cut. If I made these favors again, I would paint the lids. I filled the jars with chocolate teddy grahams. You can also use the smaller (Stage 1) jars and fill them with M&M's or other candy.
This is a Baby Bottle Six-Pack and was used as a table decoration. It's super easy to make. Paper was cut and then glued to a beer six-pack carrier (you can also sometimes find white carriers at your local scrapbooking store). The only tricky part was cutting the paper around the handle, which I had to cut with an exacto knife. Use the Terrifically Tacky Tape if the paper needs extra hold. You'll need 6 baby bottles. I used Gerber classic bottles. They were plastic but glass ones would look nice also.
Materials: Beverage Six-pack carrier, K and Company - Grand Adhesions - Brenda Walton Collection - Boy Clothesline
And of course no baby shower would be complete if I didn't scrap it. Here is both the shower and my layout for the days before the arrival and then birth day.
Materials: American Crafts 12x12 Paper Baby Collection "Georgie Porgie", American Crafts 12x12 Paper Baby Collection "Little Boy Blue", American Crafts 12x12 Paper Baby Collection "Three Bears", Stampin' Up Barely Banana 12x12 Cardstock, Stampin' Up Bashful Blue 12x12 Cardstock, Stampin' Up Apricot Appeal 12x12 Cardstock, American Crafts Occasions Boxed Ribbon Baby Collection "Mockingbird", Cricut New Arrival Cartridge, Cricut Paper Doll Dress Up Cartridge, Cricut Plantin Schoolbook Cartridge, Prima flowers