Saturday, May 29, 2010

Survivor Crop

I just came home this morning from an All-Night Survivor Crop. It was so much fun! We were separated into tribes, played games and had lots of great food. My contribution was cupcakes and a banner. Enjoy!


Materials: Cricut Paper Doll Dress Up cartridge, Cricut Everyday Paper Dolls, Cricut Life's A Beach cartridge, Stampin' Up Chocolate Chip Cardstock, Stampin' Up Close to Cocoa Cardstock

Monday, May 24, 2010

Indiana Jones Birthday Card

I made this card for my daugther to take to a birthday party for one of her Kindergarten friends. The theme of the party was Indiana Jones. This is lifted from a post made by Hollywood77 on the Cricut Paper Doll Dress Up Cartridge Exploration Forum.


Materials: Stampin' Up Chocolate Chip Card Stock, Stampin' Up Close to Cocoa Card Stock, Cricut Paper Doll Dress Up Cartridge, Cricut Everday Paper Dolls cartridge, Image Tree Antique Alphabet wooden rubber stamps

Sunday, May 23, 2010

Let's Go Fly A Kite

My daughter and husband flying kites on Easter a couple of years ago. If I did this layout again, I would like to have more close-up pictures.

Materials: Cricut Plantin Schoolbook cartridge, Cricut Heritage cartridge, Cricut Accent Essentials, K & Company Classic K Charlotte 12x12 2-sided Paper Pad, Stampin' Up Chocolate Chip Card Stock, Stampin' Up Pretty in Pink Card Stock, Stampin' Up Regal Rose Card Stock, Stampin' Up stampin' write - chocolate

Friday, May 21, 2010

Flower Pot Card

I like this card because it's pretty and generic. You could stamp "Happy Birthday", "Happy Mother's Day", "Thank You" or any other fitting saying.


Materials: MME Magnolia paper pad, Stampin' Up Chocolate Chip card stock, Stampin' Up Chocolate Chip Craft Ink Pad, Prima flowers, Marvy vase punch, Marvy edge punch, Stampin' Up Springtime Stems stamp set

Thursday, May 20, 2010

Can you believe this is me? Quite a few years ago, obviously. This is the first page I've completed for MY scrapbook. It's going to be quite a journey. Some of the flowers were cut with my Cricut and some are from an old flower arrangement that I disassembled (hey...something to do with all those flower arrangements from the 80s and 90s!). I went a little crazy with the border punch but it was new.

Materials: Cricut George and Basic Shapes cartridge, Cricut Accent Essentials cartridge, Cricut Storybook cartridge, Cricut Ancestry.com Two-Sided Designer Paper Pad by K & Company, Stampin' Up Chocolate Chip card stock, Stampin' Up Very Vanilla card stock, Stampin' Up Pink Pirouette card stock, Stampin' Up Chocolate Chip Craft Ink Pad, Stampin' Up Scallop Trim Border Punch

Wednesday, May 19, 2010

Welcome Baby Cards

I've been wanting to use this stamp for quite some time. I've played with it a couple of times and never got it to look good, until now. I stamped it in blue and then in brown, cut out the middle part of the brown, punched the blue one out and used a Stampin' Dimensional to pop it out. I used the side of an exacto knife to "rough" up the sides of the paper stamped with the Canvas stamp.

Materials: Stampin' Up Bashful Blue Cardstock, Stampin' Up Close to Cocoa Cardstock, Stampin' Up Canvas stamp, Stampin' Up Sparkling Summer stamp set, Stampin' Up Punches Three stamp set, Stampin' Up Bashful Blue Craft Ink Spot, Stampin' Up Close to Cocoa Craft Ink Pad, Stampin' Up Wide Oval Punch, Stampin' Up Dimensionals, American Crafts Mockingbird 'Baby Boy' Gift Ribbon Selection Set

Same idea for this one but I wanted to use up some cute little clothespin stickers I had.

Materials: Stampin' Up Pretty in Pink Cardstock, Stampin' Up Apricot Appeal Cardstock, Stampin' Up Canvas stamp, Stampin' Up Sparkling Summer stamp set, Kurio Patty Cake Images Dimensional Stickers

Galveston Beach


Is it time to go to the beach yet? Summer's coming! This is my daughter. We stopped at a beach in Galveston, Texas while visiting Jim's parents in 2006.

Materials: Cricut Opposites Attract cartridge, Stampin' Up Chocolate Chip Card Stock

Tuesday, May 18, 2010

Apple Picking Time

My nephew and daughter picking apples last year.


Materials: 12X12 Ancestry.com Teal & Gold Dots & Swirls Glitter Paper, 12X12 Ancestry.com Brown Swirls Decorative Glitter Paper, Cricut Alphalicious Cartridge, Heidi Swapp Chipboard Clocks - Brown, Inkadinkado Fall Season Clear Stamps

Airplane Bedroom

I can't believe I am FINALLY done with my boys room. The boys have to share a room so I had to be careful with the decor in there. Not too babyish for the older boy. Most of the wall decor was completed back in November (from Liam's airplane birthday party) but I've been dragging my feet to get it up and finish the room. Too bad Liam's crib tent covers up some of the airplane. He will be using a toddler bed soon so I didn't see a point in hanging it twice.


The vinyl was cut using my Cricut and the Opposites Attract and Everyday Paper Dolls cartridges.


I painted these shelves and little bookcase so they would match the airplane.

Monday, May 17, 2010

Child's Play

Liam and I at the our local park.


Liam playing in his walker.


Materials: Cricut "A Child's Year" cartridge, Cricut "Plantin Schoolbook" cartridge, Bazzill Basics 12x12 Scalloped Cardstock - Brown, MME Bohemia Paper-Backyard My Journey Brocade/Brown, Stampin' Up Journaling Stamp

Wednesday, May 12, 2010

Craft Shelves

I don't have a craft room so I try to use different areas in the house to store supplies. I have most of my stuff in the closet and then utilize these shelves in our living room. I've incorporated pictures of my family, all in silver frames. The larger jars are from Walmart. The small tall jars are available at either Joann's or Michael's. The glass basket contains cards that people have made me or examples that I made. I've also re-purposed some items. The smallest jars are baby food jars that I painted the lids silver to match. The 3-tier silver tin is from Starbucks (came with coffee and chocolates inside). The taller flower container once contained fancy popcorn from Target.

I used these medium sized jars (available at Joann's or Michael's) for ribbon scraps. The smaller jars contain Prima flowers.

Tuesday, May 11, 2010

Frog Diaper Cake


This is the first diaper cake that I made. If you've ever wanted to make one, you should. They are easy to make and an interesting centerpiece for a baby shower. Everything (including the diapers) can be used for baby later so there is no waste. You can incorporate the theme of the shower, as I did for this Frog Baby Shower.

To make the "cake" you roll Size 1 or 2 diapers up starting at the fold. I used Huggies because I love their diapers and they just happen to have a little blue and green stripe on them. If you don't want a pattern to show, use Pampers Swaddlers. Secure with a rubber band (I use the clear mini hair rubber bands). To start the layers, I use a baby bottle (with the lid and nipple off) and put a rubber band around it. I build the cake on a round cardboard cake board. Start adding your rolled diapers until they form a ring around the bottle. For the next ring of diapers you will need larger rubber bands. I have only been able to find the larger ones at business supply stores. For this cake, the bottom row contains three rings of diapers. Build the second layer the same way but this time add one less ring of diapers. Add another baby bottle. The top ring of this cake only had one ring of diapers. You can make your cake bigger or smaller by adjusting the amounts of rings on each level. I used hot glue to attach the ribbon so it stays secure. Ribbon was used to tie on the onesie and socks. You can also attach pacifiers, rattles, hats or just about anything! So he would sit up nice, I tied the frog to a small dowel using ribbon. I pushed the dowel down the length of the cake. The "baby" word was cut with my Cricut using the New Arrival cartridge. You can use the babies name for a more personal touch. During the shower, I placed the cake on a glass cake stand to give it some height.

Materials: 50-55 Size 1 or 2 diapers, 2 baby bottles (or tubes, thick dowels or other glass or plastic bottles), round cake board, 3 large rubber bands, 3 regular rubber bands, 50-55 very small rubber bands, wide ribbon, glue gun, Cricut New Arrival cartridge

Monday, May 10, 2010

Matzo Crusted Chicken Cutlets

When it comes to dinner, I'm all about easy. I like to make things from scratch but I don't want to be spending hours making dinner every night. This is one of our families favorite. It's no secret. The recipe is on the back of every can of Manischewitz Matzo Meal. I know a lot of people who use bread crumbs for coating but this meal mixture is a lot more tasty and creates a crunchy, non-oily coating. Tonight I made some pasta and salad to accompany the chicken.


You will need boneless chicken breast, Manischewitz Matzo Meal, salt, pepper, 1 egg and oil. I cut the chicken width-wise to make it thinner to insure complete cooking. In one bowl, add some salt and pepper to the Manischewitz Matzo to taste. In another bowl, beat the raw egg and add a teaspoon of water.

Dip chicken first into egg mixture and then into meal mixture. Place in a deep frying pan with about an inch of hot oil.


Turn over when bottom is brown.


Continue cooking until dark brown.


Cool on paper towels before serving.

Chipboard Name Sign

I made this wall hanging for my friends 12-year old daughter, Gracie, as a Christmas present a few years ago. Her favorite color was purple. The letters are chipboard. I traced the letter first and then cut them out by hand. Then, used 2-way Glue to attach the paper to the chipboard and filed the edges with an emery board. A Crop-A-Dile was used to punch holes in the letters to attach the ribbon. I used hemp twine with a small metal buckle at the ends for easy hanging. When you hang it you also need some sticky dots or something to keep the letters spaced out (they don't hang in a perfect U-shape). For a quicker project, you can ink or paint the letters and then file the edges to give a worn look.

Materials: 8.5" pre-cut chipboard letters, MME Magnolia paper, We R Memory Keepers Crop-A-Dile, Stampin' Up Hodgepodge Hardware, Emery Board, Hemp Twine

Saturday, May 8, 2010

Princess Birthday Card

For the little princess in your life! You can stamp "Queen" instead if you want to make this for an adult.

Materials: Stampin' Up Pretty in Pink Card Stock, Stampin' Up Pink Passion Card Stock, Stampin' up Stampin' Write - Pink Passion, Stampin' Up Perfect Princess Stamp Set, Stampin' Up Birthday Whimsy Stamp Set, Stampin' Up Scallop Border Punch, StazOn Black Ink Pad, VersaMark Pad

Friday, May 7, 2010

These are a few of my favorite things..

I've been scrapbooking and doing paper crafts for about four years now. It took a lot of trial and error to develop an arsenal of tools for all the cutting, gluing and attaching that I do. These are things that I take to every crop and that I keep close by in my portable organizer when doing projects. Unless I'm desperate or purchasing from Stampin' Up, I never by anything without it being on sale (at least 40% off) or with a coupon. There are many other things that I use but these I can't go without. I will be showcasing other products in the future so check in often!

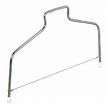
What I Call It: Paper Trimmer
It's Official Name: Fiskars 12” Portable Paper Trimmer
What Do I Do With It: Cut or trim paper and pictures up to 12"
Where Did I Get It: Joann's
How Much Did I Pay For It: $10.19 ($16.99 with a 40% coupon)

What I Call It: Duck Tape
It's Official Name: Duck Easy-Stick Double Stick Adhesive
What Do I Do With It: Attach pictures, paper and most kinds of ribbon to layouts and projects
Where Did/Do I Get It: Joann's or Michael's
How Much Did/Do I Pay For It: $7.50-8.99 for a 4-pack (14.99 with a 40% or 50% off coupon)

What I Call It: Cutter Bee's
It's Official Name: Cutter Bee 5" Scissors
What Do I Do With It: Cut small pieces of paper or ribbon
Where Did I Get It: Joann's
How Much Did I Pay For It: $5.99 ($9.99 with a 40% coupon)

What I Call It: Eyelet Setter
It's Official Name: Fiskars® Eyelet Setting Tool-3/Pc Set
What Do I Do With It: Attach three different sizes of eyelets or brads to paper, flowers or pictures
Where Did I Get It: Joann's
How Much Did I Pay For It: $10.79 ($17.99 with a 40% coupon)

What I Call It: Glue Dots
It's Official Name: Glue Dots
What Do I Do With It: Attach flowers, gems and other small embellishments
Where Did/Do I Get It: Stampin' Up
How Much Did/Do I Pay For It: $4.95


What I Call It: Red Tape
It's Official Name: Terrifically Tacky Red Line Scrapbook Adhesive
What Do I Do With It: Adhere things that need an extra strong bond such as paper boxes or securing the edges of paper or pictures, comes in three different widths
Where Did/Do I Get It: Stampin' Up, Joann's, Michaels or Walmart
How Much Did/Do I Pay For It: $1.99-6.95

What I Call It: Mat Pack
It's Official Name: Mat Pack
What Do I Do With It: Use underneath paper when attaching three different sizes of eyelets or brads, piercing paper
Where Did I Get It: Stampin' Up
How Much Did I Pay For It: $9.95

Thursday, May 6, 2010

My First Cake


Well...that's not technically correct. My first cake was a three layer cake for a friends bridal shower. It wasn't too bad except I made the cake from scratch and it was a little dry and over baked. After that I learned that most people who decorate cakes use box cakes. I used a box cake for this one and it was delicious. I practiced using the icing a few days before I made the cake. There is certainly a skill to it.

Icing Knife


To start I bought a Wilton Course 1 Cake Decorating book, which I still have and reference every time I make a cake. The booklet shows (with pictures) how to fill a bag, ice a cake and many more things. I would love to take a cake decorating class someday. I've tried to make flowers and I just don't get it. If you want to start making cakes of your own I suggest a few invaluable tools: a icing knife, a cake leveler, a Cake Icer Tip, disposable bags, and a ring and coupler.

A cake leveler does just what it says. It levels your cake. When the cake is done cooking it has a "hump" from rising. You adust the wire on the leveler and then slide it across the top of the cake. Your family will love to eat the cake that gets skimmed off the top! You can also use the leveler to "torte" or cut the cake into layers to add a filling. The filling doesn't have to be complicated, it can simply be additional icing.

One of my favorite tools is a Cake Icer Tip. It's hard not to get crumbs from your cake in your icing. When this happens, it can ruin the look of a cake. Using the Cake Icer Tip is also faster. You'll be able to recognize this tip easily because it much bigger than any other tip.

Ring and Coupler


Tips


For icing I use a Class Buttercream Frosting recipe that came in the Wilton book that I bought. It's the icing they use at Wilton classes. I like it for many reasons: (1) Most people seem to like it (2) The ingredients are fairly simple and can be found at most craft stores (3) The finished cake doesn't need refrigerated. You can't use store-bought icing, it's not the right texture for decorating.

Class Buttercream Icing (Stiff Consistency)

1 cup solid white vegetable shortening
1 teaspoon Wilton Flavor (Vanilla, Almond or Butter)
2 tablespoons milk or water
1 lb. pure cane confectioners' sugar (approx. 4 cups)
1 tablespoon Wilton Meringue Powder
A pink of salt (optional)

Cream shortening, flavoring and water. Add dry ingredients and mix on medium speed until all ingredients have been thoroughly mixed together. Blend an additional minute or so, until creamy. This make a stiff consistency. You will need to add two teaspoons of water for each cup of stiff consistency icing (two tablespoons of additional liquid for the full recipe).

Genealogy: Where to Start


Researching your family history can be a long task that truly never has an ending place. Experts in the field tell you to start with what you know and work backwards. Then, contact your oldest relative and find out all they know about your ancestors. I can't tell you how true this is. The information that your grandparents and hopefully great grandparents have is invaluable. Many sites tell you to write down everything they say but my suggestion is to either video tape or voice record the conversation. Try to get legal names for relatives. If they mention "Aunt Flo", ask if that was her legal name. Some people don't answer to their legal name because they've developed nicknames or simply don't like it. However, legal documents, the kind you will find during your research will most likely have the legal name. Don't be afraid to ask if they have any actual documentation in their possession. You will be surprised how many people are holding on to original documents such as marriage and death certificates and in the case of my family, original discharge papers for relatives that were in the Civil War. Many people will be reluctant to give these items to you to keep but you can ask to scan or copy the documents. My great grandmother (pictured above) left a video tape describing how she met my great grandfather, how and when she settled on a new farm as a young girl. Although I received this film late into my research it validated a lot of information that I had been unsure of and helped me down a couple of new roads. Even information such as remembering half of the names of children in an extended family can be helpful later on. There is another aspect of this type of research. One that the experts don't always mention. It's a lot more interesting. Names and dates are important and absolutely necessary for your research BUT learning the stories that go along with the names and dates are what make family history the most rewarding.